Met
Google Tekenen - de 'teken'-module binnen
Google Drive kun je gratis - als je tenminste over een gratis
'Google'-account beschikt - mooie instructieve en educatieve posters maken.
Hoe je dat moet doen, wordt uitgelegd op
Educational Technology and Mobile Learning: 'This Is How to Create A Simple Educational Poster Using Google Drawings'
"Posters are great to use in your class to aid your teaching. There are a plethora of web tools and mobile apps that can help you easily design beautiful visuals and infographics, this page features some of our favourite titles in this regard. However, there is also another good tool that is often overlooked by many teachers and educators which is Google Drawings. Posters you create through Drawings are automatically saved into your Drive and can be easily integrated into presentations and docs you create in your Drive. You can also print them in PDF format and use them in class. Below is an updated version of a step by step guide we published in the past to help you learn the basics of how to use Drawings to create educational posters..." Lees verder »
In dit artikel mis ik echter één belangrijke stap: Het instellen van het 'teken'-canvas in de papierformaten A4 of A3. Feitelijk is dit de eerste stap. Het 'teken'-canvas stel je zo in.
Zie afbeelding 1:
Instellen op 'A4'-formaat: 210 x 297 mm / 21 x 29,7 cm
- Open jouw Google Drive. Klik op de blauwe knop Nieuw en vervolgens op Meer en klik op Google Tekeningen.
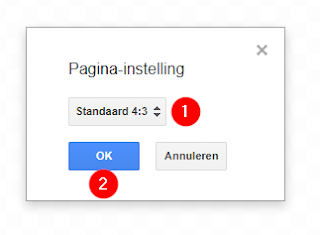
- Klik in het nu geopende nieuwe bestand op Bestand [ 1 ] en vervolgens op Pagina-instelling [ 2 ]. Zie afbeelding 1:
 |
| Afbeelding 1 |
- In het midden van het 'teken'-canvas wordt het venstertje Pagina-instelling geopend. Zie afbeelding 2:
 |
| Afbeelding 2 |
- Klik in het 'keuze'-menu op Standaard 4:3 [ 1 ] en wijzig dit in Aangepast (zie afbeelding 3) en klik vervolgens op de blauwe knop OK [ 2 ]. Zie afbeelding 3:
 |
| Afbeelding 3 |
- Er wordt nu weer een venstertje geopend. Zie afbeelding 4:
 |
| Afbeelding 4: A4-formaat instellen |
- Vul in de velden respectievelijk de breedte en de hoogte in centimeters in, dus 21 x 29,7 Centimeter.
- LET OP: verander de komma in een punt, dus 29,7 wordt 29.7. Doe je dat niet, dan wordt de opgegeven maat niet 'gepakt'.
- Klik tot slot op de blauwe knop OK.
Instellen op 'A3'-formaat: 297 x 420 mm / 29,7 x 42 cm
- Herhaal de stappen voor het wijzigen van de pagina-instelling in A4-formaat.
- Vul alleen andere maten in in het venstertje Pagina-instelling (zie afbeelding 4 hierboven).
- Denk aan het wijzigen van de komma's in punten. Zie afbeelding 5:
 |
| Afbeelding 5: A3-formaat instellen |
Infographic 'Google Tekenen'
In de blogpost '
Here Is How to Create Educational Posters for Your Class Using Google Drawings' op
Educational Technology and Mobile Learning vond ik onderstaande infographic over 'Google Tekenen'. Zie afbeelding 6:
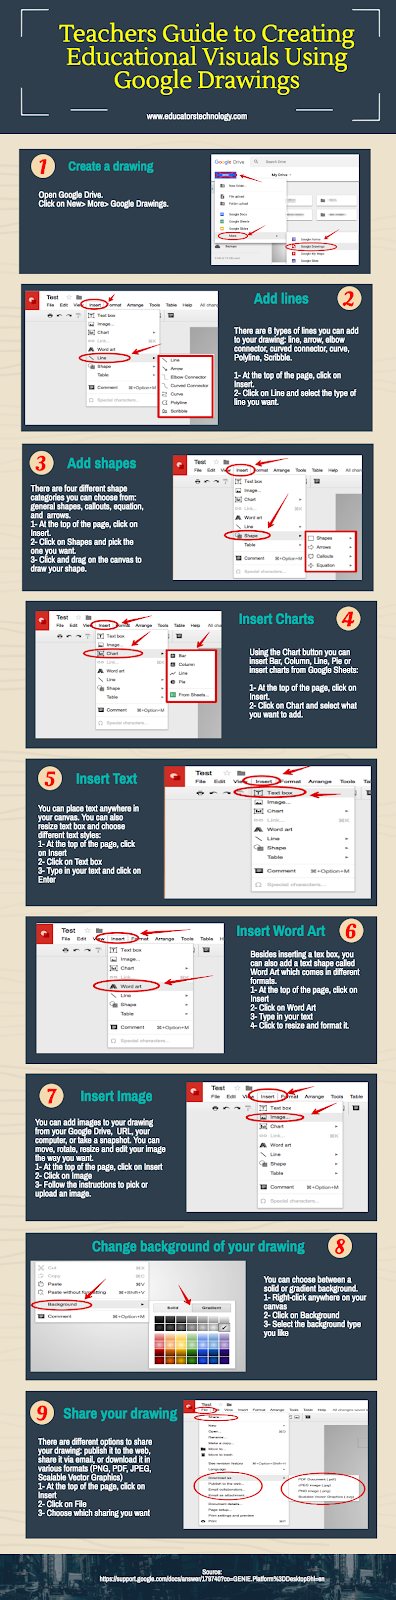 |
| Afbeelding 6: Infographic 'Google Tekeningen' |
Bovenstaande infographic kun je ook
downloaden als PDF.
De officiële handleiding voor 'Google Tekeningen'
Artikel
"... Google Drawings can serve as a good option for some desktop publishing needs. Google Drawings is a very flexible program, allowing you to add text boxes, wordart, images, shapes, and more, to any part of the Drawing, and at any angle, much like a desktop publishing program would.
One such project you can achieve with Google Drawings is creating a poster..."
Lees verder »
Gerelateerde blogposts


Geen opmerkingen:
Een reactie posten